
Rust + Embassy on the ESP32
This is a guide on setting up bare metal Rust + Embassy for Expressif’s ESP32 series of devboards. I’m not going to dive deep into the hardwire side of things however, as there are plenty of tutorials that do just that.
std vs no_std
Espressif provides a development framework called ESP-IDF which enables usage of the Rust standard library besides providing lots of useful features. It simplifies memory allocation, threading, synchronization, IO, and networking among other things which normally wouldn’t be so straightforward to have in a bare metal environment.
However, it comes at the cost of performance, memory usage, and binary size, all of which are crucial in an embedded environment. Not to mention, you won’t be missing out on much without ESP-IDF, as there are crates that provide similar functionality to ESP-IDF, although they’re not as simple to use as the Rust standard library.
Hence, we’ll be using no_std in this guide, along with the Embassy Framework which will enable async and simplify networking.
Prerequisites
To begin, we must first install the tools that will let us compile and flash our code to our ESP32.
1. Installing espup
espup is a tool for installing and maintaining the required toolchains for developing applications in Rust for Espressif SoC’s. To install it, run:
cargo install espup2. Install Necessary Toolchains
Install all the necessary tools to develop Rust applications for all supported Espressif targets by running:
espup install3. Setup Environment Variables (Linux only 🐧)
Running espup install will create a file called export-esp.sh in your home directory which you’ll have to source. To automatically source it on every shell instance, you’ll have to add its contents to your shell config.
Bash
cat ~/export-esp.sh >> ~/.bashrcFish
cat ~/export-esp.sh >> ~/.config/fish/config.fishSetup
Generating the Template
To generate a template project, run:
esp-generate --chip your-chip your-project-nameIt should present a UI that looks like this:
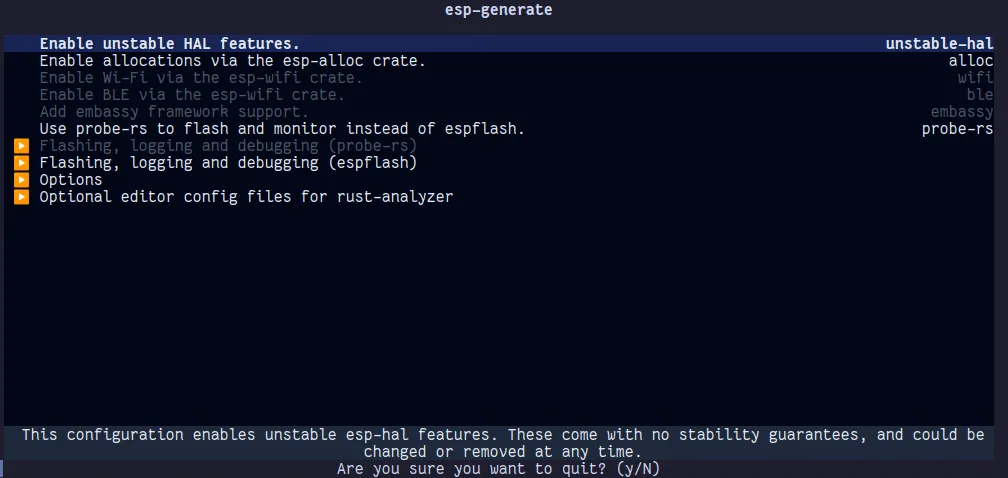
Enable unstable-hal and embassy. You may also want to enable esp-alloc and esp-wifi if you need WiFi/BLE. Next, go to “Flashing, logging and debugging (espflash)” and enable defmt and esp-backtrace. Then go to “additional editor config files” and enable the option for your editor so that rust-analyzer plays nice. Then press S to generate the template.
Changing the Flash BAUD Rate
The default BAUD rate for flashing is quite slow. To change it, open .cargo/config.toml. There should be a line that looks something like this:
runner = "espflash flash --monitor --chip esp32"espflash allows us to set the baud rate through an argument called --baud: A baud rate of 921600 is stable and fast enough for me.
runner = "espflash flash --monitor --chip esp32 --baud=921600"Writing Some Code
Now we can finally get to writing some actual code. If you open src/bin/main.rs, it should look like this:
#![no_std]
#![no_main]

use defmt::info;
use embassy_executor::Spawner;
use embassy_time::{Duration, Timer};
use esp_hal::clock::CpuClock;
use esp_hal::timer::timg::TimerGroup;
use {esp_backtrace as _, esp_println as _};

#[esp_hal_embassy::main]
async fn main(spawner: Spawner) {
    let config = esp_hal::Config::default().with_cpu_clock(CpuClock::max());
    let peripherals = esp_hal::init(config);

    let timer0 = TimerGroup::new(peripherals.TIMG1);
    esp_hal_embassy::init(timer0.timer0);

    info!("Embassy initialized!");

    // TODO: Spawn some tasks
    let _ = spawner;

    loop {
        info!("Hello world!");
        Timer::after(Duration::from_secs(1)).await;
    }
}
Let’s break down what’s going on here. Spawner is a handle to spawn async tasks into an Executor. Unlike other async runtimes such as tokio, Futures cannot be moved between threads. Therefore, each thread requires its own Executor instance. For the main thread, one is automatically created for you.
From the ESP-IDF docs,
The ESP32 chip contains two hardware timer groups. Each group has two general-purpose hardware timers. They are all 64-bit generic timers based on 16-bit pre-scalers and 64-bit up / down counters which are capable of being auto-reloaded.
We have to initialize embassy with one of the timers, so it can manage tasks and allow us to use timing-related functions.
Blinking an LED
Let’s take a look at how we can blink some LEDs. Connect the cathode (shorter lead) of your LED to GND and the anode (longer lead) to a GPIO pin. Make sure to use an appropriate resistor so the LED doesn’t burn out.
use esp_hal::gpio;

// ...

let mut led_pin = gpio::Output::new(
    peripherals.GPIO32,
    gpio::Level::Low,
    gpio::OutputConfig::default(),
);

loop {
    led_pin.set_high();
    Timer::after(Duration::from_millis(500)).await;
    led_pin.set_low();
    Timer::after(Duration::from_millis(500)).await;
}
Nothing much to explain here. We are intializing pin 32 with default configuration and a default state of Low. Let’s look into how we can perform other tasks when this loop pauses
DHT11 Temperature Sensor Module

DHT11/DHT22 is a popular temperature and humidity sensor. To use it, connect module to your ESP32, and install the dht-sensor crate.
cargo add dht-sensorThen create a function like so:
#[embassy_executor::task]
async fn dht_sensor_task(pin: gpio::Flex) {
    loop {
        match dht_sensor::dht11::read(&mut embassy_time::Delay, &mut pin) {
            Ok(reading) => {
                info!("Temperature: {}, Humidity: {}", reading.temperature, reading.humidity)
            }
            Err(err) => {
                error!("Failed to read from DHT11 sensor: {:#?}", err);
            }
        };

        Timer::after(Duration::from_secs(3)).await;
    }
}
We have to mark async functions with #[embassy_executor::task] to be able to spawn them into an executor. This is because invoking async functions requires a dynamic allocation, and we don’t have an allocator in an embedded environment. To solve this issue, embassy uses the #[task] macro to statically allocate memory for the task at compile time. A limitation of this macro is that it doesn’t allow generics.
By default, you can only spawn one instance of a task at a time. However, an optional pool_size parameter can be used to specify how many concurrent tasks can be spawned for the function.
Okay, now let’s spawn the task.
#![no_std]
#![no_main]

use defmt::info;
use embassy_executor::Spawner;
use embassy_time::{Duration, Timer};
use esp_hal::clock::CpuClock;
use esp_hal::timer::timg::TimerGroup;
use esp_hal::gpio;
use {esp_backtrace as _, esp_println as _};

#[esp_hal_embassy::main]
async fn main(spawner: Spawner) {
    let config = esp_hal::Config::default().with_cpu_clock(CpuClock::max());
    let peripherals = esp_hal::init(config);

    let timer0 = TimerGroup::new(peripherals.TIMG1);
    esp_hal_embassy::init(timer0.timer0);

    info!("Embassy initialized!");

    let mut led_pin = gpio::Output::new(
        peripherals.GPIO32,
        gpio::Level::Low,
        gpio::OutputConfig::default(),
    );

    // "Flex" just means Input + Output
    let mut dht11_pin = gpio::Flex::new(peripherals.GPIO25);
    dht11_pin.set_as_open_drain(gpio::Pull::Down);
    dht11_pin.set_high();

    spawner.must_spawn(dht_sensor_task(dht11_pin));

    loop {
        led_pin.set_high();
        Timer::after(Duration::from_millis(500)).await;
        led_pin.set_low();
        Timer::after(Duration::from_millis(500)).await;
    }
}
We now have two async functions running concurrently on the same thread.
Utilizing the Second Core
The ESP32 has a second core (called the app core) which we may want to use when running computationally heavy tasks.
use esp_hal::system::CpuControl;
use embassy_executor::Spawner;

macro_rules! mk_static {
    ($t:ty,$val:expr) => {{
        static STATIC_CELL: static_cell::StaticCell<$t> = static_cell::StaticCell::new();
        #[deny(unused_attributes)]
        let x = STATIC_CELL.uninit().write(($val));
        x
    }};
}

// 16 KiB, adjust according to your needs
static mut SECOND_CORE_STACK: esp_hal::system::Stack<{ 16 * 1024 }> = esp_hal::system::Stack::new();

#[esp_hal_embassy::main]
async fn main(spawner: Spawner) {
    // ..

    let mut cpu_control = CpuControl::new(peripherals.CPU_CTRL);
    let _ = cpu_control
        .start_app_core(unsafe { &mut SECOND_CORE_STACK }, || {
            let executor = mk_static!(esp_hal_embassy::Executor, esp_hal_embassy::Executor::new());
            executor.run(|spawner| {
                info!("Hello from 2nd core!");
                spawner.must_spawn(second_core_task(spawner));

                // do other stuff
            });
    })
    .unwrap();

    // ..
}

#[embassy_executor::task]
async fn second_core_task(spawner: Spawner) {

}
mk_static is a helper macro to make creating StaticCells more convenient. StaticCell provides a no-std-compatible, no-alloc way to reserve memory at compile time for a value, but initialize it at runtime, and get a 'static reference to it.
executor.run requires a &'static mut self and the safe way to provide that is through a StaticCell. However, if you’re comfortable using unsafe, you may instead use static mut like shown for the stack memory allocation.
Useful libraries
- micromath - Math functions for embedded devices
- mipidsi - Interfacing with SPI, I2C, and DSI displays
- picoserve - async HTTP and WebSockets for embedded devices
- heapless - Stack allocated versions of dynamically sized types (
String,Vec, etc.)